May 2025

Simple Cartoon Drawing
Character Drawing Ideas

Simple Cartoon Drawing: Easy Guide to Fun & Creative Doodles

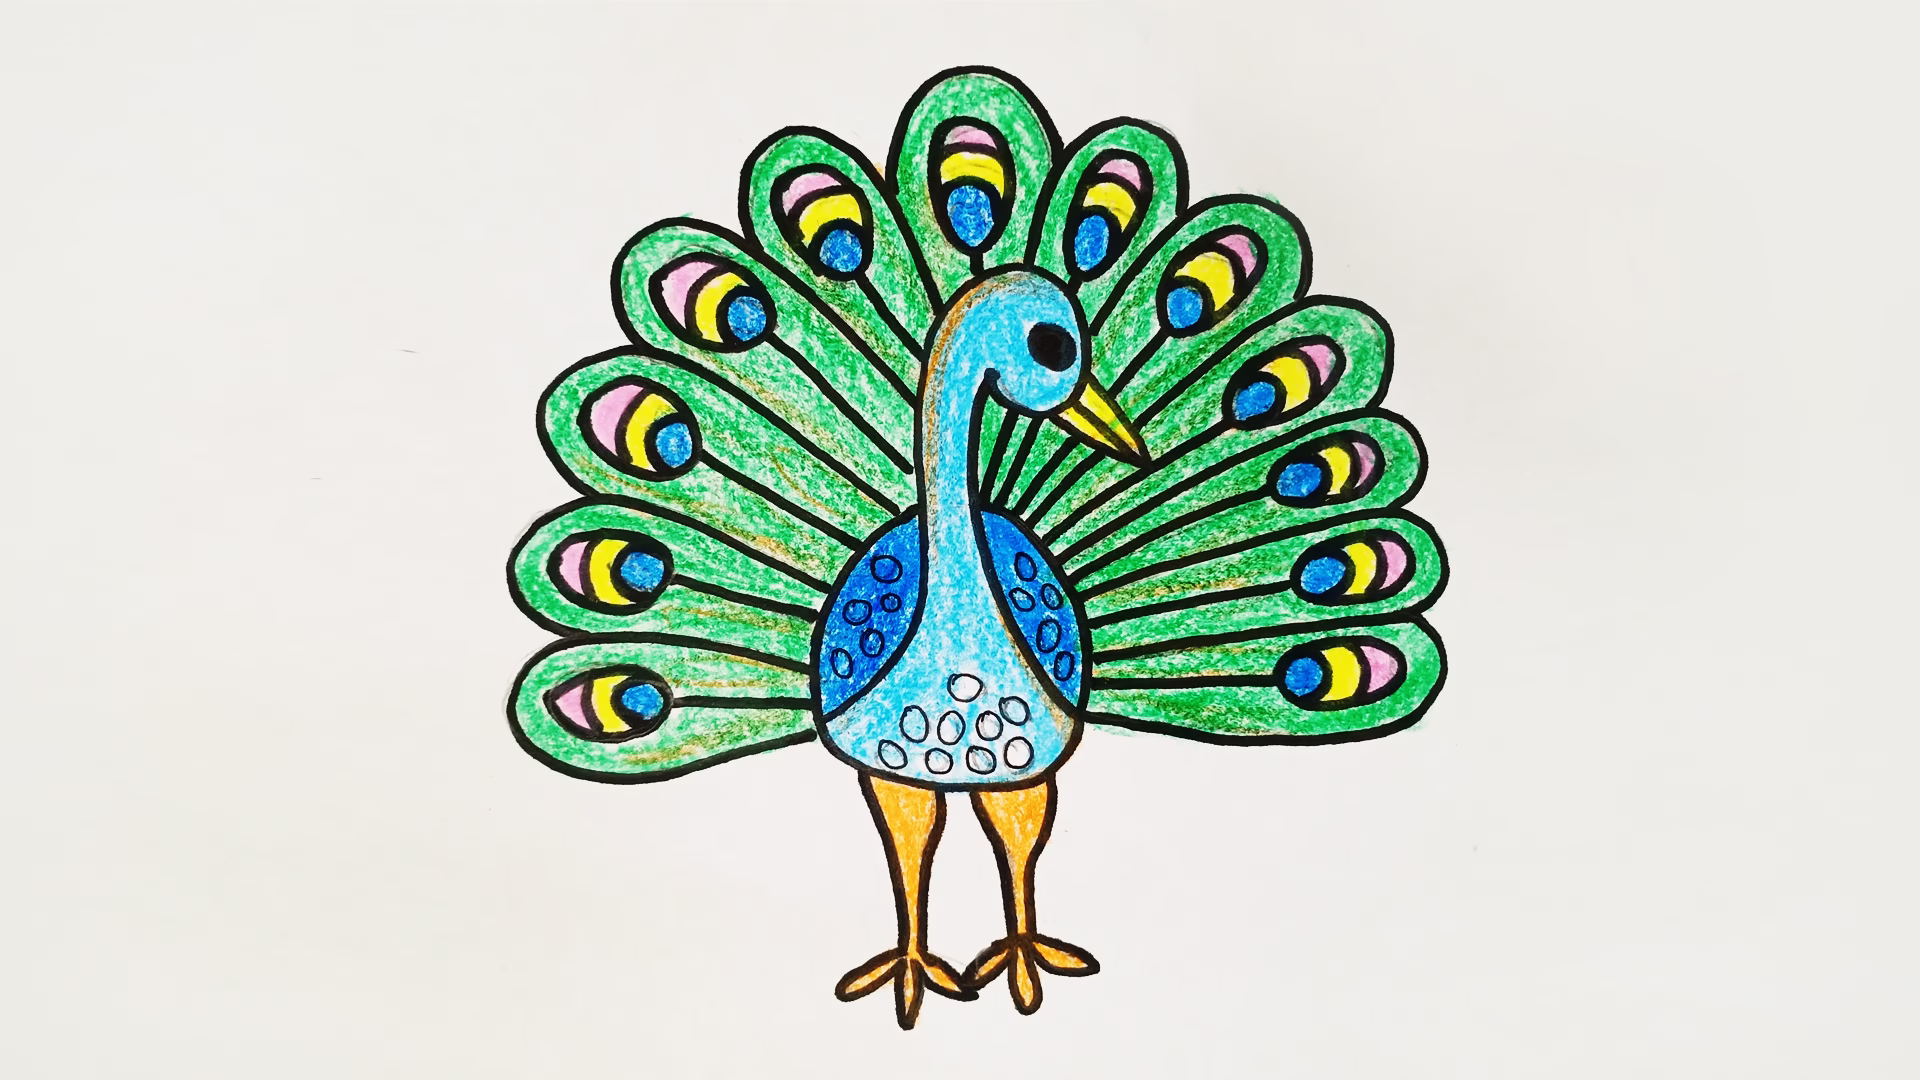
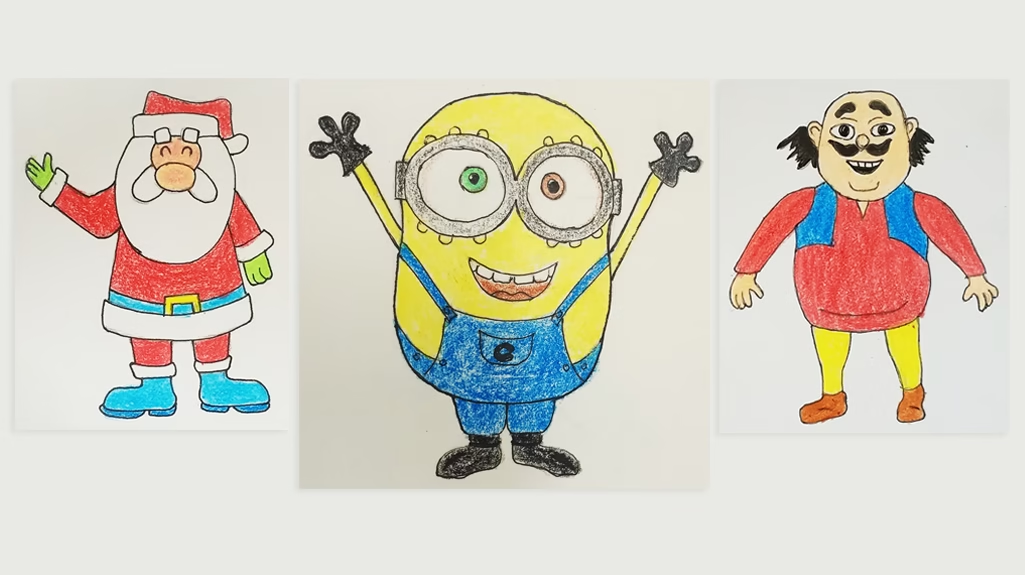
Ever looked at a quirky cartoon character and thought, “I wish I could draw something like that”? Maybe you’ve doodled absentmindedly in notebooks, creating little stick figures with surprisingly expressive faces. Or perhaps you’re convinced you don’t have an artistic bone in your body. Well, I’m here to tell you something exciting: simple cartoon drawing is not just for a gifted few. It’s an accessible, joyful, and advantageous skill that anyone–yes, anyone–can learn and enjoy. Forget the intimidating art classes, the pressure of photorealism, or the idea that you need expensive tools. Simple cartoon drawing is about embracing imperfection, finding fun in basic shapes, and unlocking a playful side of your creativity you might not even know you have. It’s about communication, expression, and pure, unadulterated fun. So, grab a pencil, a piece of paper (any paper!), and dive into the delightful universe of simple cartoon drawing. Why Bother with Simple Cartoon Drawing? More Than Just Doodles! You might be thinking, “Okay, it sounds fun, but what’s the point?” The benefits of engaging in simple cartoon drawing are surprisingly vast: The Only Tools You Need (Hint: You Probably Have Them) One of the biggest beauties of simple cartoon drawing is its accessibility. You don’t need a fancy art studio or expensive software. See? No major investment required. The barrier to entry for simple cartoon drawing is wonderfully low. The Building Blocks: Shapes are Your Superpower! At its heart, a simple cartoon drawing is about combining basic shapes. Think of them as your secret artistic LEGOs. The primary shapes you’ll use constantly are: Practice drawing these shapes. Fill a page with circles of different sizes. Draw wobbly squares and elongated rectangles. Get comfortable with them. Then, start combining them. A circle on top of a rectangle? Instant, simple person! Two small circles inside a big one? You’ve got eyes on a face! Let’s Get Drawing: Your First Simple Cartoon Steps Ready to put pencil to paper? Let’s start with the absolute basics. The key is to look at a subject (real or imagined) and mentally break it down into its simplest component shapes. This “seeing in shapes” is a fundamental skill in simple cartoon drawing. Adding That Spark: Expression and Exaggeration Cartoons are all about emotion and personality. Even the simplest cartoon drawing can be incredibly expressive. Practice, Play, and Patience: The Three P’s of Progress Like any skill, getting comfortable with simple cartoon drawing takes a little practice. But the emphasis here is on playful practice. Finding Your Unique Simple Cartoon Style As you continue to practice and play, you’ll naturally start to develop your own little quirks and preferences. Maybe you love drawing characters with really big noses, or perhaps your style leans towards super-minimalist lines. This is your unique voice emerging! Don’t force a style; let it evolve organically as you explore what you enjoy drawing. The more you engage in simple cartoon drawing, the more your personal touch will shine through. Beyond the Basics: Where Could Simple Cartoon Drawing Take You? Once you’re comfortable with the fundamentals, there are so many fun avenues to explore: The Most Important Step? Just Start. The journey into simple cartoon drawing doesn’t begin with talent or expensive supplies. It begins with a single, simple line. It begins with the willingness to try, to play, and to embrace the joy of creating something from nothing. So, put down this article for a moment. Pick up that pencil. Draw a wobbly circle. Give it some eyes and a smile. Congratulations – you’re already doing it! You’re engaging in the wonderful, accessible, and endlessly entertaining world of simple cartoon drawing. Welcome to the club. We’re happy to have you! Now, go fill some pages and have an absolute blast.

how to draw peacock drawing easy step by step
Bird Drawing Ideas

How to Draw a Peacock – Step-by-Step Guide for Beginners

Drawing a peacock is more than just an artistic endeavor – it’s a doorway to creativity, patience, and precision. Peacocks are renowned for their vibrant plumage, graceful posture, and intricate patterns. Capturing their beauty on paper may seem intimidating, but with the right guidance, anyone can learn to draw this majestic bird. This guide is designed specifically for beginners, walking you through each step clearly and simply. You’ll find that once you understand the basic shapes and feather placement, things start to fall into place beautifully. Think of this as building a puzzle – piece by piece, the image becomes more cohesive, and the sense of achievement becomes very real. Ready to bring a peacock to life on your sketchpad? Let’s get started with the tools you’ll need and what makes this bird such a rewarding subject. Why Drawing a Peacock is a Great Artistic Exercise You might wonder: why a peacock? Why not a cat, dog, or some simpler bird? Here’s the magic: drawing a peacock teaches you a wide range of essential drawing skills in one subject. This exercise strengthens your technical drawing abilities and sharpens your observation skills. Plus, once you get the hang of it, it’s incredibly fun! Tools and Materials You’ll Need Before we dive into sketching, let’s prepare your workspace. You don’t have to break the bank on fancy art materials – grab these simple essentials to begin your drawing journey: Essential Tools: Optional Add-ons: With your tools ready, you’re now equipped to begin drawing! Understanding the Anatomy of a Peacock If you want to draw something well, you need to understand how it’s built. Just like learning how a car works before driving, studying a peacock’s anatomy makes your drawing look accurate and lifelike. Let’s break it down into parts: Head and Crest: Peacocks have a small, rounded head with a crest of upright feathers that fan slightly. Their beak is slender and curved, while their eyes are usually round and expressive. Neck and Body: The neck is long, elegant, and curves naturally. It connects to a full, oval-shaped body that resembles a slightly squashed circle when viewed from the side. Wings and Legs: Peacock wings are not always fully visible since their tails often dominate the composition, but they are positioned toward the lower middle of the body. Legs are thin, with three toes in front and one in the back. Tail (Train): This is the main attraction! The tail fans out behind the peacock and is covered in “eye-spots”—circular feather patterns that resemble eyes. The tail can be drawn open in full display or down in a more relaxed position. Understanding these components allows you to draw confidently. Step 1 – Sketching the Basic Shapes Before diving into the fine details, let’s start with the foundation. Sketching basic shapes will guide your composition and ensure the proportions are correct. Think of it like building a house—you need a solid blueprint first. Drawing the Body and Neck Begin with the body, which resembles an oval or egg shape tilted slightly forward. This shape will act as the central part of your peacock, where the neck, wings, legs, and tail will all connect. It’s better to draw lightly so you can easily erase or modify your lines. Next, sketch the neck. Draw a graceful, elongated “S” shape extending upward from the top of the oval. This helps capture that natural, elegant curvature of the peacock’s neck. The width of the neck should be consistent but taper slightly near the head. Proportions to consider: This foundational step sets up the whole pose of your peacock. Try a few different positions—maybe the peacock is looking sideways or slightly tilted. Gesture drawing, or quick sketches that capture motion, can help warm you up here. Outlining the Head and Beak Now, at the top of the neck, draw a small circle for the head. This will later be refined, but for now, just get the placement right. From the circle, extend a short triangle outward for the beak, slightly curved and pointed. Add a small crosshair on the face (lightly) to position the eyes later. This helps you align facial features symmetrically. Remember: You can adjust the neck’s angle at this stage to capture the exact look you’re going for—graceful, proud, or even playful. Step 2 – Drawing the Eyes and Crest This part gives your peacock personality. Eyes and crest feathers are small, but they bring life to the bird’s face. Adding Expressive Details Start with the eyes. Place them just behind the beak and slightly below the centerline of the head. They should be almond-shaped or round, depending on your chosen style. Leave a small white highlight in each eye to make them sparkle. Use a softer pencil (2B or 4B) to darken the eyes and add depth. You can shade lightly around them to create a shadowed socket effect. Don’t forget the peacock’s crest—those elegant upright feathers that look like a tiny fan on top of the head. Draw about 5–7 thin stems rising from the crown, each ending in a small circle or teardrop shape. Tips: These touches bring grace and identity to your drawing. Even at this early stage, you should start seeing your peacock’s unique character. How to Make It Look Realistic Realism is all about attention to small features: Use a reference image here to guide your detailing. Try to capture that intelligent, curious expression peacocks often have. Your drawing is no longer just lines—now it’s a bird with personality. Step 3 – Shaping the Feathers and Tail Now we get to the showstopper: the tail. This is where patience, practice, and precision really come into play. Structure of the Peacock’s Tail Start with the tail base—draw two curved lines extending from the lower back of the peacock’s body. These will form the outer frame of the tail, like a giant fan behind the body. Inside this fan shape, begin sketching rows of feathers. Think of them like layers

Best Professional Nail Art Brushes Review
Blog

Best Professional Nail Art Brushes Review

If you’re passionate about nails and love experimenting with designs, investing in the best professional nail art brushes isn’t just a luxury—it’s a must. Think of these tools like a painter’s favorite brushes; the better the tools, the better the masterpiece. Nail art has become more than a trend – an art form and a self-expression medium.  But here’s the thing: with the market overflowing with choices, how do you figure out which brush set is worth your hard-earned cash? That’s where this guide steps in. We’ve broken down everything—from types of brushes to top picks and how to care for them—so you never have to second-guess your purchase again. So grab your coffee (or gel polish), and let’s dive into the world of nail art brushes that’ll make your manicure look straight out of a salon! Types of Nail Art Brushes Understanding the types of brushes available is the first step toward becoming a nail art wizard. Each brush is designed for a specific function, and knowing how to use them will expand your creative possibilities. Liner Brushes Liner brushes are long, thin, and flexible—perfect for creating long, straight lines, stripes, or intricate geometric designs. If you’re into abstract looks or love nail striping, a liner brush will be your best friend. They come in different lengths and thicknesses, so it’s great to experiment with a few to see which works best with your hand movement. Detail Brushes These are the fine-tipped brushes that allow for precision work—think tiny flowers, animal prints, or fine filigree. A detail brush is indispensable for anyone aiming to create complex designs without smudging or overlapping. Most professional sets include at least one of these because it’s so versatile. Flat Brushes Perfect for one-stroke techniques and creating gradient or ombré effects, flat brushes are wide and rectangular. They allow for smooth blending and are great for applying polish over large surface areas. Artists love using them for color transitions and layered painting. Fan Brushes Fan brushes might look unusual, but they have a unique purpose. They’re great for creating feathered or wispy effects, as well as for dusting off excess powder from glitter or chrome finishes. A good fan brush can also help you create stunning gradient transitions with minimal effort. Dotting Tools While technically not a brush, dotting tools are essential for any nail artist. They’re ideal for polka dots, eyes, flower centers, and even marble effects. Many professional brush sets include double-ended dotting tools in various sizes. Best Professional Nail Art Brushes 1. Artdone 31pcs Nail Art Brushes Set This all-in-one brush set includes a versatile collection of striping brushes, dotting tools, fan brushes, and even nail dust brushes. Ideal for both amateurs and professionals, it offers the complete toolkit for experimenting with various designs—from abstract art to floral patterns. 2. Komall Nail Art Liner Brushes (5pcs) These fine-tipped liner brushes are designed for creating ultra-detailed work like stripes, swirls, and miniatures. Each brush comes in a different length, offering flexibility for various art styles. 3. SAVILAND 6PCS Nail Art Brushes Set This set includes brushes for both nail extensions and detailing, making it ideal for nail technicians and home users who enjoy experimenting with 3D art and gradients. Features to Look for in Professional Nail Art Brushes Picking the right nail art brush isn’t just about the brand—it’s about understanding the brush itself. There are key features that determine whether a brush will help or hinder your creative flow. Here’s what you need to know before clicking “add to cart” or picking one off a beauty shelf. 1. Bristle Quality: The bristle is the soul of any brush. Whether synthetic or natural, high-quality bristles hold their shape, don’t shed easily, and offer excellent pigment control. Synthetic bristles, especially nylon, are great for gel and acrylic paints, while natural options like Kolinsky hair are top-tier for acrylic applications. 2. Brush Tip Variety: Different designs require different tools. A well-rounded set should have liner, detail, flat, fan, and dotting brushes. Each shape plays a specific role—liners for long lines, detail brushes for tiny accents, and fan brushes for gradients or glitter effects. 3. Handle Design and Grip: Let’s be honest—precision comes from comfort. Look for brushes with ergonomic handles that feel natural in your hand. Lightweight, non-slip grips reduce fatigue during long sessions and offer more control for intricate designs. 4. Durability: Cheap brushes may save money upfront, but if they fray, shed, or warp after a few uses, it’s a waste. Quality brushes last through countless manis if you care for them right. Pay attention to how well the ferrule (the metal part) is attached—it keeps the bristles secure. 5. Ease of Cleaning: You want brushes that clean easily without damaging the fibers. Some brushes are designed to resist clumping or sticking, which is crucial when working with fast-drying mediums like gel polish or acrylic paint. By focusing on these features, you’ll find a set that not only enhances your art but also stands the test of time. Benefits of Using High-Quality Nail Art Brushes Using top-notch brushes is like upgrading from a dull knife to a precision blade in the kitchen—you instantly notice the difference. Here’s why going for quality pays off in nail artistry. Precision & Accuracy: High-quality brushes hold their shape, letting you draw razor-sharp lines, detailed flowers, or perfect swirls. There’s no need to go over your work twice or fix fuzzy edges caused by low-end tools. Longer Lifespan: A good set can last for months—even years—if taken care of. While low-cost brushes may fray or lose bristles quickly, premium brushes bounce back after every use and cleaning, maintaining their original quality. Better Product Control: Whether you’re using gel, acrylic, or polish, professional brushes pick up and distribute product more evenly. This gives you cleaner results, reduces product waste, and enhances the final finish. Increased Efficiency: Struggling with bad tools slows you down. Good brushes streamline your workflow, help you complete designs faster, and reduce cleanup or

Best Professional Makeup Brushes Set
Blog

Best Professional Makeup Brushes Set

If you’re a seasoned makeup artist or someone who simply loves experimenting with beauty products, having the right set of makeup brushes can truly transform your application process. Great tools improve precision and help you make the most of your cosmetics. With a wide range of brush sets available today, choosing the perfect one can feel overwhelming. That’s why we’ve curated a detailed review of the best professional makeup brush sets on the market, helping you confidently make an informed decision. 1. Sigma Beauty Essential Brush Kit – Best for Full-Face Coverage If you’re searching for a top-tier makeup brush set trusted by professionals worldwide, the Sigma Beauty Essential Kit is a worthy investment. This 12-piece set is perfect for achieving a full-face makeup look with ease and precision. What Makes It Stand Out: Ideal For: Professional makeup artists and enthusiasts who want premium quality with long-lasting durability. 2. Real Techniques Everyday Essentials – Best Affordable Option Quality doesn’t always have to come with a high price tag. The Real Techniques Everyday Essentials set proves this by offering a well-rounded selection of tools at a budget-friendly price. Why It’s Loved: Perfect For: Beginners or makeup users looking for a budget-friendly yet effective brush set. 3. Morphe Vegan Pro 18-Piece Brush Set – Best for Versatility If variety and functionality are your priorities, the Morphe Vegan Pro 18-piece set delivers. It’s tailored for makeup lovers who like to experiment with different looks. What Sets It Apart: Best Suited For: Aspiring makeup artists or beauty influencers who need an expansive toolkit. 4. IT Cosmetics Heavenly Luxe™ Brush Set – Best for Sensitive Skin For those with sensitive or delicate skin, the IT Cosmetics Heavenly Luxe™ brushes are a dream come true. Known for their incredibly soft texture, these brushes feel like silk against the skin. Highlights: Ideal For: Users with sensitive skin who value comfort without compromising performance. 5. Zoeva Classic Brush Set – Best for Precision and Craftsmanship Zoeva is synonymous with elegance and quality. The Classic Brush Set combines both aesthetics and precision to create a set that’s as beautiful as it is functional. Why It Stands Out: Best For: Those who appreciate fine craftsmanship and want brushes that perform with expert-level precision. How to Choose the Best Professional Makeup Brush Set Choosing the right brush set depends on your makeup style, skill level, and skin type. Here are a few key things to consider: 1. Bristle Type 2. Handle Design Look for brushes with comfortable, ergonomic handles that offer good control. A sturdy handle improves precision and feels more balanced in the hand. 3. Range of Brushes A good set should include: 4. Maintenance and Durability Brushes should hold their shape after washing and not shed bristles. Investing in a high-quality set often means fewer replacements over time. 5. Ethical Choices Many users now prefer cruelty-free and vegan options. Fortunately, most top brands have adopted ethical practices without sacrificing quality. You may want to read about double rhythm 05 oz cat eye gel polish FAQs About Professional Makeup Brush Sets Q: How often should I clean my makeup brushes? A: Ideally, clean your brushes once a week to prevent bacteria buildup and ensure smooth application. Brushes used for cream or liquid products may need more frequent cleaning. Q: Are expensive makeup brushes worth it? A: While budget brushes can perform well, high-end brushes usually offer better durability, more precision, and a luxurious feel. They are a smart investment for frequent users. Q: Can I mix and match brush sets from different brands? A: Absolutely! Many professionals customize their kits by combining favorite brushes from different brands. Q: What should I use to clean my brushes? A: Use a gentle brush cleanser or baby shampoo with lukewarm water. Avoid harsh detergents, and let them air-dry with bristles facing downward. Q: Do I need all the brushes in a large set? A: Not necessarily. Choose a set that matches your routine. If you stick to minimal makeup, a smaller set with multi-functional brushes might be better suited. Final Thoughts A great makeup brush set can significantly elevate your beauty routine. Whether you’re going for a soft everyday glow or a bold glam look, the tools you use play a critical role in the outcome. From the luxurious feel of Sigma Beauty to the budget-friendly efficiency of Real Techniques, there’s a perfect set for every user. Keep in mind your preferences, skin type, and the type of makeup you use regularly when choosing your ideal kit. With the right brushes in hand, achieving a flawless finish becomes not just easier but genuinely enjoyable. So, go ahead and treat yourself to a professional brush set that matches your needs—your makeup game will thank you for it!

Drawing Artificer Logo

Drawing Artificer is an artistic platform that provides a vest of Drawing Ideas and Artistic knowledge. 

Drawing Artificer participates in the Amazon Services LLC Associates Program, an affiliate advertising program designed to provide a means for sites to earn advertising fees by advertising and linking to Amazon.com. *Amazon and the Amazon logo are trademarks of Amazon.com, Inc., or its affiliates.

© 2025 Drawing Artificer. All rights reserved

Get 30% off your first purchase

X
Scroll to Top